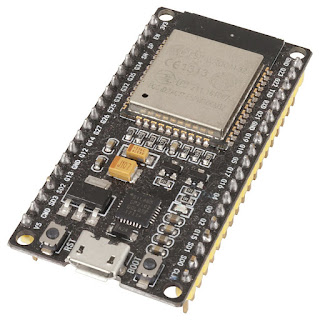
Introduction
I've just started using the ESP32 for my IoT projects and I wanted to record the experience. So here we are! The ESP32 makes for a great low power IoT sensor hub and is a more capable alternative to the Arduino. The caveat is that there is a bit more mucking around to get it to work. There is also some complexity in getting a dual-core microcontroller to play along with a real-time operating system.
I purchased my board from Jaycar in Australia, I'm sure you can get cheaper versions ordering direct from China.
The toolchain for programming the ESP32 in C is a bit of a pain. You’ll need Espressif’s software library (esp-idf), a cross-compiler and build tools that are specific to the chip (xtensa-esp32-*), and a utility to flash the resulting binary file to the device. There are a few different options to program the ESP32, including:
- ESP-IDF - the official IoT development framework for ESP32.
- Arduino IDE - requires an add on.
- Microsoft Visual Studio Code
- Eclipse
- PlatformIO
- EmbedXcode
In the next post I'll try a few of these to see if any offer advantages over the others.
MicroPython
MicroPython is a complete development environment that runs on the ESP32 processor.
The install is done by flashing a firmware image to the board, and then accessing the serial terminal
running at 115200 Baud to enter commands directly into the interpreter. The image can be
downloaded from this page: https://micropython.org/download/#esp32
The esptool.py program will be installed if you have installed the Arduino addon (it’s what does the
uploading under Arduino), otherwise, it can be installed from its GitHub page at: https://github.com/espressif/esptool.
ESP32
The ESP32 is a dual core 32 bit microcontroller featuring WiFi and Bluetooth, and is able to be programmed with the Arduino IDE through an ESP32 add on. Note that not all libraries or functions that work with the ESP8266 or Arduino are yet functional on this new board.
It utilises the Xtensa® dual-core 32-bit LX6 microprocessor running at 240MHz, which is a step up from the ESP8266, while having similar power consumption.
The ESP32 ESP32 can also interface with other systems to provide Wi-Fi and Bluetooth functionality through its SPI / SDIO or I2C / UART interfaces. The ESP32 module comes preloaded with a ROM image of the AT command set, just like the ESP8266 did. If you want to waste 95% of this chip’s potential by using it as a glorified serial-to-WiFi modem, you are good to go!
The operating voltage of ESP32 ranges from 2.3V to 3.6V. When using a single-power supply, the recommended voltage of the power supply is 3.3V, and its recommended output current is 500 mA or more. My board includes a 5V to 3.3V regulator to allow you to power it via USB.
ESP32 has 34 GPIO pins which can be assigned various functions by programming the appropriate registers. There are several kinds of GPIOs: digital-only, analog-enabled, capacitive-touch-enabled, etc. Analog-enabled GPIOs and Capacitive-touch-enabled GPIOs can be configured as digital GPIOs.
Most of the digital GPIOs can be configured as internal pull-up or pull-down, or set to high impedance. When configured as an input, the input value can be read through the register. The input can also be set to edge-trigger or level-trigger to generate CPU interrupts. For low-power operations, the GPIOs can be set to hold their states.
The ESP32 integrates 12-bit SAR ADCs and supports measurements on 18 channels (analog-enabled pins). Some of these pins can be used to build a programmable gain amplifier which is used for the measurement of small analog signals. The ULP-coprocessor (Ultra Low Power) in ESP32 is also designed to measure voltage, while operating in the sleep mode, which enables low-power consumption. With the appropriate setting, the ADCs and the amplifier can be configured to measure voltage on 18 pins maximum.
The ESP32 has 10 capacitive-sensing GPIOs, which detect variations induced by touching or approaching the GPIOs with a finger or other objects. The low-noise nature of the design and the high sensitivity of the circuit allow relatively small pads to be used.
ESP32 vs ESP8266
The predecessor of the ESP32 was the ESP8266. The feature comparison between the two boards is shown below.
Feature Summary
You can download the ESP32 data sheet but a summary of the ESP32's features are as follows:
- 240 MHz dual core Tensilica LX6 microcontroller with 600 DMIPS
- Integrated 520 KB SRAM
- Integrated 802.11 b/g/n HT40 Wi-Fi transceiver, baseband, stack and LwIP
- Integrated dual mode Bluetooth (classic and BLE)
- 16 MB flash, memory-mapped to the CPU code space
- 2.3V to 3.6V operating voltage
- -40°C to +125°C operating temperature
- Onboard PCB antenna / IPEX connector for external antenna
Sensors:
- Ultra-low noise analog amplifier
- Hall sensor - detects magnetic fields
- 10x capacitive touch interfaces
- 32 kHz crystal oscillator
34 x GPIO:
- 3 x UARTs, including hardware flow control
- 3 x SPI
- 2 x I2S
- 18 x ADC input channels
- 2 x DAC
- 2 x I2C
- Infrared Remote Control
- PWM/timer input/output available on every GPIO pin
- OpenOCD debug interface with 32 kB TRAX buffer
- SDIO master/slave 50 MHz
- Supports external SPI flash up to 16 MB
- SD-card interface support
Security Related:
- WEP, WPA/WPA2 PSK/Enterprise
- Hardware accelerated encryption: AES/SHA2/Elliptical Curve Cryptography/RSA-4096
Performance:
- Supports sniffer, Station, SoftAP and Wi-Fi direct mode
- Max data rate of 150 Mbps@11n HT40, 72 Mbps@11n HT20, 54 Mbps@11g, and 11 Mbps@11b
- Maximum transmit power of 19.5 dBm@11b, 16.5 dBm@11g, 15.5 dBm@11n
- Minimum receiver sensitivity of -97 dBm
- 135 Mbps UDP sustained throughput
- 5 μA power consumption in Deep-sleep


Has anyone ever got the serial port (TXD0/RXD0) working on DUINOTECH ESP32 from Jaycar? I simply cannot get the port setup.
ReplyDelete