The story so far...
In previous posts we have described building a Raspberry Pi based telepresence robot. At the moment, the robot can be remotely controlled via a web site to which it also streams video from the Pi camera. We have also added an ultrasonic sensor on a PTZ mount to allow it to roam autonomously. The next step in the robots evolution is to add voice recognition and speech using Amazon Alexa.
pi-top PULSE
The Raspberry Pi doesn't come with a microphone or speaker. There are lots of ways that you can add this capability but we decided to use the pi-top PULSE. The PULSE includes:
- RGB LED's - 7x7 grid, illuminated speaker, underside ambient HAT and pi-top Accessory compatible;
- SPEAKER - 2W with I2S amplifier; and a
- MICROPHONE - 200Hz to 11KHz response Automatic Gain Control (ACG).
Not only can we use the speaker and microphone for interfacing with Alexa but we can show some emotional/behaviour state changes via the LED's.
Wearing Multiple HATs - The 1st Problem
Even though HATs (Hardware Attached on Top) are not intended to be stacked, you can stack up to 62 HATs and not have an address collision. This assumes you don't have conflicting pin usage and you have compatible stackable headers.
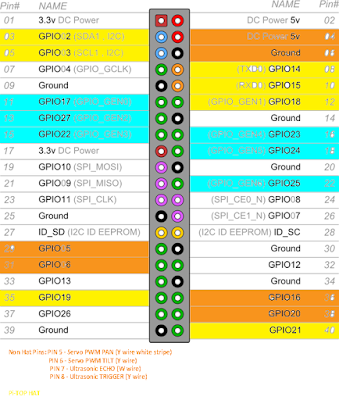
The best way to check HAT / stackable board compatibility is to map out what every pin is being used for.
The image above illustrates the pin usage for the robot. The key is as follows:
- Orange Pins - Are general I/O pins used for the PTZ servo's and ultrasonic sensor.
- Blue Pins - Motor Driver Board pin usage.
- Yellow Pins - Pi Top PULSE HAT pin usage.
Thus we don't have any electrical conflicts and can move on to the mechanical interfacing issues.
To call something a HAT it must meet the HAT requirements. We are using the Seeed Motor Driver Board (shown above) which can't be called a HAT because it doesn't have a full size 40W GPIO connector or an ID EEPROM. This presents us with two problems:
- We need access to 6 of the 14 pins which are not extended through the Motor Board.
- Even if all 40 pins were extended, placing the PULSE on top of the Motor Board wouldn't allow access to the power and GPIO pins used for the servo PTZ control and ultrasonic sensor.
To solve this issue, we need a GPIO expansion shield which provides 3 x 40 pin connections in parallel. We can then use a couple of male to female cables to connect our "HAT's". We will conclude this build in the next post (once the expansion shield has arrived).


No comments:
Post a Comment