Showing posts with label Alexa. Show all posts

Saturday, September 23, 2017

Raspberry Pi and Alexa Mobile Robot (Part 1)

The story so far...


In previous posts we have described building a Raspberry Pi based telepresence robot. At the moment, the robot can be remotely controlled via a web site to which it also streams video from the Pi camera. We have also added an ultrasonic sensor on a PTZ mount to allow it to roam autonomously. The next step in the robots evolution is to add voice recognition and speech using Amazon Alexa.

pi-top PULSE


The Raspberry Pi doesn't come with a microphone or speaker. There are lots of ways that you can add this capability but we decided to use the pi-top PULSE. The PULSE includes:

  • RGB LED's - 7x7 grid, illuminated speaker, underside ambient HAT and pi-top Accessory compatible;
  • SPEAKER - 2W with I2S amplifier; and a 
  • MICROPHONE - 200Hz to 11KHz response Automatic Gain Control (ACG).

Not only can we use the speaker and microphone for interfacing with Alexa but we can show some emotional/behaviour state changes via the LED's.

Wearing Multiple HATs - The 1st Problem


Even though HATs (Hardware Attached on Top) are not intended to be stacked, you can stack up to 62 HATs and not have an address collision. This assumes you don't have conflicting pin usage and you have compatible stackable headers.

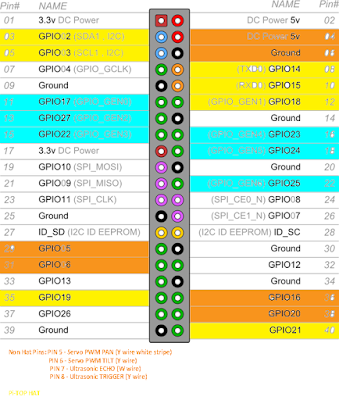
The best way to check HAT / stackable board compatibility is to map out what every pin is being used for.


The image above illustrates the pin usage for the robot. The key is as follows:

  • Orange Pins - Are general I/O pins used for the PTZ servo's and ultrasonic sensor.
  • Blue Pins - Motor Driver Board pin usage.
  • Yellow Pins - Pi Top PULSE HAT pin usage.
Thus we don't have any electrical conflicts and can move on to the mechanical interfacing issues.


To call something a HAT it must meet the HAT requirements. We are using the Seeed Motor Driver Board (shown above) which can't be called a HAT because it doesn't have a full size 40W GPIO connector or an ID EEPROM. This presents us with two problems:

  1. We need access to 6 of the 14 pins which are not extended through the Motor Board.
  2. Even if all 40 pins were extended, placing the PULSE on top of the Motor Board wouldn't allow access to the power and GPIO pins used for the servo PTZ control and ultrasonic sensor. 
To solve this issue, we need a GPIO expansion shield which provides 3 x 40 pin connections in parallel. We can then use a couple of male to female cables to connect our "HAT's". We will conclude this build in the next post (once the expansion shield has arrived).


Wednesday, March 15, 2017

Controlling the Raspberry Pi via a web browser

Web Controlled Robot


Now that we can stream video to a web page it would be nice to be able to remotely control our robot. To do this we will us the Raspberry Pi to run a web server that serves the page used to control the robot. Once we have this up and running you will be able to drive your robot around using a browser on your laptop via WiFi on your LAN.

As shown in the previous post, you can use the python command print(server) to see what URL you need to point your browser at to see the video and control your robot. The way the controls work is as follows:
  1. Typing the address of your Pi served page (e.g. http://192.168.0.9:8082) into your browser will send a web request to the python program running the server, in our case RS_Server.py.
  2. RS_Server responds with the contents of index.html. Your browser renders this HTML and it appears in your browser.
  3. The broadcasting of video data is handled by the broadcast thread object in RS_Sever. The BroadcastThread class implements a background thread which continually reads encoded MPEG1 data from the background FFmpeg process started by the BroadcastOutput class and broadcasts it to all connected websockets. More detail on this can be found at pistreaming if you are interested. Basically the camera is continually taking photos, converting them to MPEG's and sending them at the frame rate to a canvas in your browser.
  4. You will see below that we have modified the index.html file to display a number of buttons to control our robot. Pressing one of these buttons will send a GET request to the server running on your Pi with a parameter of "command" and the value of the button pressed. We then handle the request by passing on the appropriate command to our MotorControl class. To do this we will need to bring together RS_Server and RS_MotorControl in our new RS_Robot class.

Modifying index.html


The index.html file provided by pistreaming just creates a canvas in which to display our streaming video. To this we will add a table with 9 command control buttons for our robot. You could get away with only 5 (Forward, Back, Left, Right and Stop) but looking ahead we know we will also need 4 more (speed increase, speed decrease, auto and manual). Auto and Manual will toggle between autonomous control and remote control (i.e. via the browser). Associated with each button is a JavaScript script that will send the appropriate command when the button is clicked.

In addition to controlling your robot via the on screen buttons you can use the keyboard. We have mapped the following functionality:

Up Arrow      = Forward
Down Arrow = Back
Left Arrow    = Left
Right Arrow  = Right
Space             = Stop
-                     = Decrease Speed
+                    = Increase Speed
m                   = Manual
a                    = Autonomous

You can modify the index.html to map whatever keybindings you want. Be aware that the keycode returned by different browsers isn't always consistent. You can use the JavaScript Event KeyCode Test Page to find out what key code your browser returns for different keys.

The manual and auto modes don't do anything at this stage. 

The modified index.html file is shown below.

<!DOCTYPE html>
<html>
<head>
    <meta name="viewport" content="width=${WIDTH}, initial-scale=1"/>
    <title>Alexa M</title>
    <script src="http://ajax.googleapis.com/ajax/libs/jquery/1.3.2/jquery.min.js" type="text/javascript" charset="utf-8"></script>

    <style>
        .controls {
            width: 150px;
            font-size: 22pt;
            text-align: center;
            padding: 15px;
            background-color: green;
            color: white;
        }
    </style>

    <style type="text/css">
            body {
                background: ${BGCOLOR};
                text-align: center;
                margin-top: 2%;
            }
            #videoCanvas {
                // Always stretch the canvas to 640x480, regardless of its internal size.
                width: ${WIDTH}px;
                height: ${HEIGHT}px;
            }
    </style>

    <script>
    function sendCommand(command)
    {
        $.get('/', {command: command});
    }
    
    function keyPress(event)
    {
        keyCode = event.keyCode;
        
        switch (keyCode) {
            case 38:                // up arrow
                sendCommand('f');
                break;
            case 37:                // left arrow
                sendCommand('l');
                break;
            case 32:                // space
                sendCommand('s');
                break;
            case 39:                // right arrow
                sendCommand('r');
                break;
            case 40:                // down arrow
                sendCommand('b');
                break;
            case 109:               // - = decrease speed
            case 189:
                sendCommand('-');
                break;
            case 107:
            case 187:
                sendCommand('+');   // + = increase speed
                break;
            case 77: 
                sendCommand('m');   // m = manual (remote control)
                break;
            case 65:
                sendCommand('a');   // a = autonomous
                break;
            default: return;        // allow other keys to be handled
        }
        
        // prevent default action (eg. page moving up/down with arrow keys)
        event.preventDefault();
    }
    $(document).keydown(keyPress);
    </script>
</head>

<body>

    <h1><FONT color=white>Alexa M</h1>

    <!-- The Canvas size specified here is the "initial" internal resolution. jsmpeg will
        change this internal resolution to whatever the source provides. The size the
        canvas is displayed on the website is dictated by the CSS style.
    -->
    <canvas id="videoCanvas" width="${WIDTH}" height="${HEIGHT}">
        <p>
            Please use a browser that supports the Canvas Element, like
            <a href="http://www.google.com/chrome">Chrome</a>,
            <a href="http://www.mozilla.com/firefox/">Firefox</a>,
            <a href="http://www.apple.com/safari/">Safari</a> or Internet Explorer 10
        </p>
    </canvas>
    <script type="text/javascript" src="jsmpg.js"></script>
    <script type="text/javascript">
        // Show loading notice
        var canvas = document.getElementById('videoCanvas');
        var ctx = canvas.getContext('2d');
        ctx.fillStyle = '${COLOR}';
        ctx.fillText('Loading...', canvas.width/2-30, canvas.height/3);
        // Setup the WebSocket connection and start the player
        var client = new WebSocket('ws://${ADDRESS}/');
        var player = new jsmpeg(client, {canvas:canvas});
    </script>

    <table align="center">
    <tr><td  class="controls" onClick="sendCommand('-');">-</td>
        <td  class="controls" onClick="sendCommand('f');">Forward</td>
        <td  class="controls" onClick="sendCommand('+');">+</td>
    </tr>
    <tr><td  class="controls" onClick="sendCommand('l');">Left</td>
        <td  class="controls" onClick="sendCommand('s');">Stop</td>
        <td  class="controls" onClick="sendCommand('r');">Right</td>
    </tr>
    <tr><td  class="controls" onClick="sendCommand('m');">Manual</td>
        <td  class="controls" onClick="sendCommand('b');">Back</td>
        <td  class="controls" onClick="sendCommand('a');">Auto</td>
    </tr>
    </table>

</body>
</html>

Python Robot Class


As Alexa M continues to evolve, so too will this robot class. For now we can keep things pretty simple. In addition to creating a robot class we have updated the motor control, servo and server classes. Rather than reproduce all the code, we will provide links to our Gist Repository where you can download the latest versions. For completeness, I will also provide links to the HTML and JavaScript library that you will need. All these files need to be in the same directory.

  1. RS_Robot.py version 1.0 - Run this script on your Pi to create a telepresence rover.
  2. RS_Server.py version 1.1 - Updated to include command parsing.
  3. RS_MotorControl.py version 1.1 - New motor control methods.
  4. RS_Servo.py version version 1.2 - License added.
  5. index.html version 1.0 - The file shown in the previous section.
  6. jsmpg.js - Dominic Szablewski's Javascript-based MPEG1 decoder.
That completes the remote control and video streaming portion of the design. We hope you have as much fun driving around your robot as we do. Next up we will look at battery monitoring and autonomous control of the robot.

Sunday, February 12, 2017

Raspberry Pi Robot - Alexa M

Raspberry Pi Robot


As mentioned in an earlier post we recently acquired an Amazon Echo Dot. We have also been playing around with a 2WD robot chassis and the Raspberry Pi. Put all these together and you have the makings of an interesting robot. The folks over at Dexter Industries obviously had the same idea.


We are going to have a crack at making our own version - called Alexa M (to differentiate it from our Echo Dot). We will do this in stages to ensure each part works!

In part 1, we will construct a pan/tilt bracket which could hold an ultrasonic sensor or a camera.