The Plan
F450 Airframe Kit
My latest project is an Arduino based self levelling drone. Being a rubbish pilot, I want the drone to be easy to handle and have the capability to carry a small video camera. There are a number of different designs available and I want to use a combination of the best available. One of my frustrations while building the drone was that none of the designs were complete, I would get a certain way into construction only to discover that I am missing a part. Where this happened to me I have made sure that I added the part to the list below (including connectors and specific cables).
Arduino Uno - used for the Flight Controller
I wanted to use an Arduino as the flight controller so that I have control over the drone firmware and can modify it as required. There is no better way to learn about drones / quadcopters than to build one! The base drone firmware is based on the YMFC-AL code from Joop Brokking. An electronic schematic of the drone is available from the Brokking.net site. Download a copy of this and print it out, you will refer to it frequently. It is in the zip file that contains the firmware (more on this later).
The drone platform I will utilise is the F450 Airframe kit. This airframe has an integrated PCB board built into the lower platform for connecting ESC's. This makes wiring the electronics much easier.
FlySky (FS-T6) 6 Channel Transmitter
The original versions of the DJI F450 airframe are still very expensive (over $1K), but you can get very cheap copies from China. My aim is to build the drone for under $250. You will be able to do it cheaper than this if you already have some of the parts and consumables. The motor and ESC kit comes with 1045 props but I have replaced these with 8045 props to reduce the ESC/motor load and make the drone more responsive (as suggested by Mr Brokking).
The end result.
Parts List
You will need to purchase the following parts. I have indicated part numbers, price and a link to where I bought them.
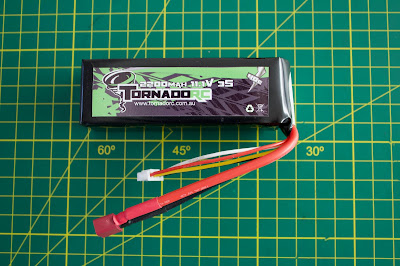
3S, 2200 mAh, 40C LiPo Battery
Feel free to replace with compatible models. Make sure they are compatible, for example we are using a 3S version of the LiPo batteries because this is at the upper voltage limit of the Arduino regulator.
3S LiPo Balanced Battery Charger
Tools
You will require the following tools to put the drone together.
- 2.0mm Hex Wrench For frame and motor installation.
- Scissors to open up all the packaging!
- Diagonal Cutters
- Long nosed pliers
- Wire Strippers
- Small phillips head screw driver
- Hot glue to insulate solder
- Soldering-iron and solder
- Multimeter
- 3D Printer (optional)
FlySky 6 Channel Receiver (comes with Transmitter)
Specifications
1000kV motor / 10 x 4.5 props / ESC Kit
A2212 motor:
KV: 1000
Max Efficiency: 80%
Max Efficiency Current: 4-10A (>75%)
Current Capacity: 12A/ 60s
No Load Current @ 10V: 0.5A
No. Of Cells: 2-3 Li-Poly
Motor Dimensions: Φ27.5* 30mm
Shaft Diameter: Φ3.17mm
30A brushless ESC:
Output: Continuous 30A, Burst 40A up to 10 Secs.
Input Voltage: 2-4 cells lithium battery or 5-12 cells NiCd/NIMh battery.
BEC: 2A / 5V (Linear mode).
Max Speed: 210,000rpm for 2 Poles BLM, 70,000rpm for 6 poles BLM, 35,000rpm for 12 poles BLM. (BLM: BrushLess Motor)
1045 Propellers (original):
Diameter of Shaft: 6.0mm
Adjustable by hole adapter (3mm, 3.2mm, 4mm, 5mm, 6mm, 6.35mm, 7.95mm)
Thickness of center: 9.7mm
Recommended wheelbase: 550mm - 700mm
| 8045 8 X 4.5 Carbon Fiber Propellers (replacements): |
8045 Carbon Fibre Propellers
- Material: carbon fiber
- Size: 8 x 4.5"
- Shaft diameter: 5mm
- Total length: 20cm
- Weight: 5.2g for each prop
MPU 6050
MPU-6050 gyro / accelerometer
- Power supply: 3~5V
- Communication mode: standard IIC communication protocol
- Chip built-in 16bit AD converter, 16bit data output
- Gyroscopes range: +/- 250 500 1000 2000 degree/sec
- Acceleration range: +/- 2g, +/- 4g, +/- 8g, +/- 16g
Next up we will start construction...


Thanks for sharing such helpful data. This is very nice and this information isn't accessible therefore simply. Thus I give thanks to the author for the helpful input.
ReplyDeleteDJI Enterprise drone Training